Friday, July 31, 2009

The Captain is here!

Yes! I am finally done with the captain dwarf. He has been sculpted for while and now that he is ready , I regret not have taking a picture of him prior the glasses and the hair were added.
He is much a character I must say. I truly love how he turned up.


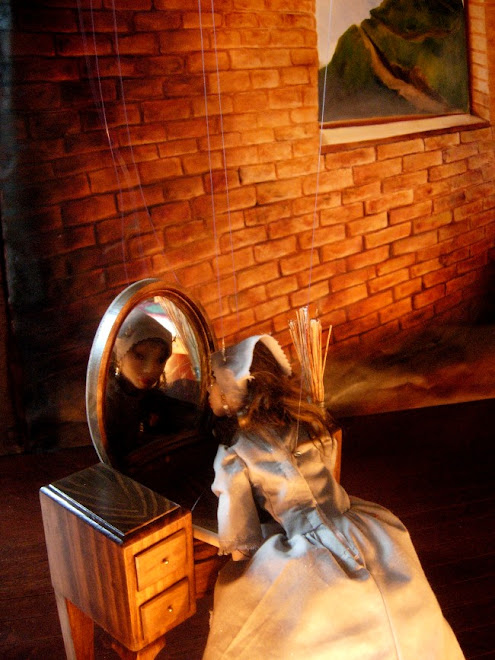
His glasses were made from welding rod. I love to weld ( my new passion) and thanks to my dolls I had to learn about it. The lenses have 3 coats of clear resin.


It still a little wet and today the humidity was high so i got foggy pictures, sigh, sorry about that*grin*


I did not forget about the hands. They are setting now. I have been working many hours daily while we are off school. I have been working with many things at the same time so it tales me more time to get one thing done but when I do, I get several done at the same time.


All my marionette will look very different when I start the costume. They will have hats or head pieces. I can't wait!


Wednesday, July 29, 2009

Marionette hands...molding process.

Okay, this is not a tutorial but an idea of how to make hands for marionettes. If you have questions I will be happy to answer it for you. Here I have my set of hands that I sculpted out of polymer clay and fired. These hands have a wire armature and I fired on the oven for one hour and at temp. 225. The tools you see are all handmade. I hardly buy tools because I am particular about my process and many times I spend MORE time preparing than the actually process. The mold is just an empty milk just that I cut on half and adjusted to the size I needed.I taped to seal it.
It is necessary to build a *body* around your prototype and find the *line* where it will meet the other part. Because I am using silicone as a mold making, I am much flexible about my lines because silicone will move for me . My shop is busy at this moment with tons of plaster molding as I have been working on my new dolls. I am making these mold inside my house so forgive me my poor lighting.

Here the clay body is almost ready. Now I need to trim a bit and fit properly inside the mold.


I also had to make a *pour hole* . that was easy... I just added clay around the wrist.


Silicone was poured. It takes about 10 hours for the setting.


Remove the mold. It looks great. No bubbles at all. I am happy about it. *grin*


Here I have the mold back inside the milk jug . I had to do some trimming. Then I placed the same hand inside . I did the pouring and now I must wait until tomorrow to see the complete mold.I will try my first resin hand tomorrow. I can't wait. This is my first time making hands this way.

Making marionettes hands and molds


I know it has been a while since I posted about the marionettes. I am sorry about that and thank you all of you that are interested in this art and to follow me. I know you have busy lives and to take your time to visit me and leave me comments is so precious to me. *Thank you*
Here is a picture of a hand ,that was at the time I took this picture, unbaked.
I have now a set of baked hands. This will serve me as a prototype, a test in fact.
I have, over the years, tried to improve in how the marionettes not only looks but performs. I will always admire and enjoy the *old time* wooden/plaster marionettes but now days we have a huge variety of options for mediums that dramatically improves the final results.
My idea is to make a silicone mold and use resin as medium to reproduce the hands. Why? Because it will be faster but will not compromise the looks plus it will be strong too.
Remember my puppeteers are children and believe me , back stage they *play* their own *plays* with one another and I am always telling them "be careful with the hands".*grin*
It will be more economical too. I like that. If this works, I will make a set of hands for the witch, one female, and probably one more male just to have the variety.
I don't like to use my camera when I am doing things because my hands are always so messy , but I do plan to take you to this process all the way.Perhaps you too one day will try to make a marionette for your own?grin. You will love that forever- I promise!

Thursday, July 23, 2009

From large to tiny....

It has been a while since I posted here. My time is very limited right now as I am am spending LOTS of time with patitadolls. I have sculpted one more of the 7 dwarfs but I have not painted him yet. I plan to soon upload some of my backdrops too. They are huge.... 6 feet by 6 feet and all in oil .... the little picture that you see on the side of my template here is also one of my backdrops from last year ..... it is Cinderella's Castle and it measures the same size, so you can have an idea.... I plan to take pictures holding the canvas for you to see.*grin*
The pictures that I am showing you today is a tiny ( incomplete) dollhouse doll. It was a commission work . I have not sculpted many tiny dolls so this was a fun thing for me to do. She measured under 4" when she was standing and unbaked . The little cat is one inch long and 1/2" tall ....